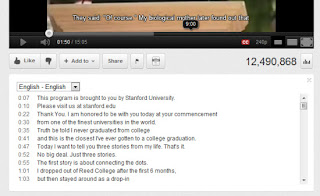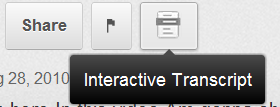
Interactive Transcripts is a cool, relatively new YouTube feature that is designed to enhance your video-viewing experience. You might already be familiar with subtitles for films. They are there to supplement the audio to help viewers better understand what's being said. YouTube now has a feature, Interactive Transcripts, which act just as subtitles, but they are interactive, which means not only can they be played with the video, they can also shown separately and made clickable, so that when you click on a certain piece of text, it will take you to that point in the video where it was said. In this post, we'll talk about how you can create transcripts, and how to add them to your YouTube videos.
There are many uses for these transcripts. Primarily, they provide subtitles which can be turned on or off according to users' preferences. But a great plus point is, they make video content searchable! People can simply search for a piece of text, say a song lyric, and come up with a video! They can then mouse over and click on that lyric to hear the song at that particular point! Cool, huh? People no longer need to remember video titles or links, so long as they know what's inside that video.
Creating transcript files
There are basically two types of transcripts, simple transcripts and captions. Transcript files are simple text files. They just contain the main content of the video. A simple transcript file could look like this;
This is the first line
This is another line
This is the last line
Notice how each line is separated by a double line-break. This denotes a pause between the two lines. If there's shouting or laughing, and nothing is being said, it's best to include something like [laughing] or [shouting] to let the viewers know what's happening. The reason you should do this is because YouTube takes care of the timing of these transcripts for you. It has advanced algorithms and a speech recognition system that automatically times the lines with the speech. So the sound of laughing or shouting might throw it off, which is why it's best to include a hint.
Captions files are usually in Subtitle formats, such as .SUB or .SRT. They have time-stamps with the lines as well. A typical Captions file would look like this
This is the first line
0:00:07.430,0:00:11.600
This is another line
0:00:11.600,0:00:14.009
This is the last line
0:00:11.600,0:00:14.009
This is the last line
0:00:14.009,0:00:15.889
[pause]
You can manually add time-stamps for your video in a text file, and save it with a .SUB or .SRT extension.
Adding transcripts to videos
By now, you should have your transcript ready. Log into your account on YouTube, and click on your username on the top-right corner of your screen. Then click on Video Manager to manage your uploads.
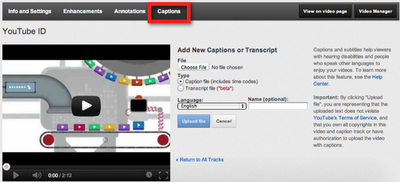
You can add transcripts to your existing videos, or you can upload new videos. Next your uploaded videos, you will see an Edit option, and an arrow next to it. Click on the arrow, and select the Captions and Subtitles options.
Next, you'll see the Add New Caption or Transcript option. You can now upload a transcript or caption file, which will automatically be integrated with your video once the initial processing is done. And that's it! You should now see a transcript button when you open your Videos' public link. Make sure before uploading the file whether you have selected the correct language, and whether it is a caption or transcript. Both work differently, so make sure you choose the appropriate option.

You can turn on captions for any Video (if provided). This could be a great help for non-native speakers of the video's language. So upload them now, and make your videos more accessible and get one step ahead in marketing your videos!

If you don't want to get yourself into Serious Technical Trouble while editing your Blog Template then just sit back and relax and let us do the Job for you at a fairly reasonable cost. Submit your order details by Clicking Here »


:)! when mind stops, topics directory came to an termination :) always similar things are produced ! ^_^ np! keep up the hard work!
ReplyDeleteFree Ad Spots
good info bro www.mytechpromo.com
ReplyDeletevery nice and informative post thanks for sharing.
ReplyDeleteregards
smartincomeguide.com
Nice post dude,
ReplyDeletetopphotosblog.blogspot.in
New thinking
ReplyDeletethanks for posted
intersting post... but this process is little time consuming...:)
ReplyDeleteProBloggers ABCD-Z
Nice post, just added captions for one of my Video
ReplyDeletehttp://youtu.be/eEibq2EpxGA
Thanks qasim
Nice..
ReplyDeleteVery useful post, Thanks
ReplyDeleteThanks For Informative Post Qasim :)
ReplyDeleteVisit: TecheHow Blogger Tricks
WOW..
ReplyDeletereally very Good and Informative post Bro.!!
thanks..)
Tricksme-The Technology and Internet Tricks Blog
another good post :)
ReplyDeleteBest4Hack
brother its not as much latest feature as you saying by they pictures are good enough to help beginners like me :)
ReplyDeleteGoogle Authorship Verification for Multiple Authors for Blogger [Video]
This is really nice!!, but I have a question... I have seen that in some websites the black menu in the youtube videos, instead of being black the color of the menu is grey, do you know how to do that?
ReplyDelete